
Elevate your swimwear game with our stylish and trendy sewing pattern designed for the fashion-forward DIY enthusiast. The Mini Sweetheart Top Sewing Pattern allows you to create a mini tie neck and tie back bikini top that’s perfect for soaking up the sun in style 😎 Embrace your cleavage and create a bikini top that complements the smaller bust. This tiny top gives the girls a lift. Our pattern is designed to flatter, ensuring you feel fabulous and confident in your creation 💎 Express your creativity by adding personal touches, such as embellishments, contrasting trims, or even mix-and-match Sew Skimpy patterns. The possibilities are endless!
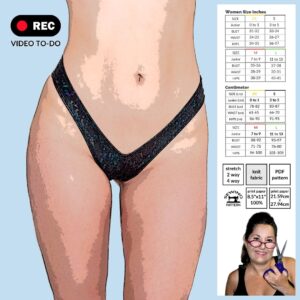
- Includes sizes XS-L
- One coverage option, Mini top runs smaller than most
- Formatted to print on US letter (8.5 x 11)
- Test square in US 2 x 2 inch and Metric unit 5.08 cm
- Pattern is color coded per size so you can make YOUR custom size
This is a DIGITAL product, available for instant download immediately after purchase. Due to the nature of this product, returns, exchanges, and refunds are not permitted.
What You Will Need
- 2 pieces 24” long Minimum neck tie string 1 3/8” wide (I use pre-cut binding)
- 1 piece 8” long top binding string 1 3/8” wide
- 1 Yard long by 2” wide Under Bust String (make string longer for larger sizes)
- 1/4 yard 2 or 4 way stretch fabric (you can use scraps) place pattern on the fabric grain / arrow
- Matching Thread
- Overlock machine / zig-zag stitch on a regular sewing machine
- Binding Foot is optional (I never used one)
Pattern Assembly
- Pin the center of the top binding (2) to the center fold of the top front (1)
- Stay stitch binding (2) to the top front edge of (1) Overhang binding ½” on both sides (binding sizes listed on sewing pattern)
- Wrap binding (2) around top (1) fabric edge. Finish the stitch using a cover stitch, zigzag stitch, or any other stretch stitch.
- Snip off the unfinished ends of the binding on both sides of the top (cut 2 binding ends that overhang)
- Fold top (1) in half and sew the center inside of the binding with a strait stitch. This is for a pointier V in between the bust (optional step)
- For side neck tie strings (3) pin one 24” binding piece to each outside edge of top (1) Measure to the top tip of triangle and pin. Use pinning measurements listed on sewing pattern. The next step – stay stitch (see video for instruction)
- Wrap binding (3) around top (1) fabric edge. Finish the stitch using a cover stitch, zigzag stitch, or any other stretch stitch.
- Snip off the unfinished ends of the lower binding on both sides of the top (cut 2 binding ends)
- Fold the under bust strap (4) in half the long way with the right side of fabric facing
out. - Pin the folded center of the under bust strap (4) to the lower center of top (1) and sides. Use these pinning measurements per size from the center pin to outside edge, Use pinning measurements listed on sewing pattern. Next step – stay stitch (see
video for instruction) - Fold both sides of the remaining unfinished under bust string (4) together with right sides of fabric together.
- Sew together unfinished edges with a serger stitch. Stop sewing right before you get to the top (1) leaving a small opening.
- Use a string turner and pull both side strings (4) so the right side of fabric is exposed and facing out.
- With a cover stitch, zigzag stitch or any stretch flatten the under bust strap (4) by sewing over the hidden serger stitch. You will tuck in and hide the unfinished fabric on both sides of the top as you finish the string.
- Tie the ends of the strings on both sides. Two neck strings and two back stings. Larger sizes will require longer string to tie around the back.
- Assembly Tutorial Video https://youtu.be/YxZTDwOoP9Y